One of the most common nightmares when sanding with an orbital sander is ending up with swirl marks. Considering sanding is supposed to produce a pristine surface, ugly swirl marks mean something went wrong. But what are the reasons for Your Orbital Sander Leaving Swirl Marks.

We will cover the causes and workable solutions and share tips on avoiding the orbital sander leaving swirl marks.
Why Does an Orbital Sander is Leaving Swirl Marks?
Swirl marks or pigtails occur from improper use of an orbital sander and if the sander malfunctions. This can be because you are pressing or moving the sander too fast. Using the wrong grit size and not following a sequence. It can also result from a buildup on the sanding paper or a worn-out backup pad.
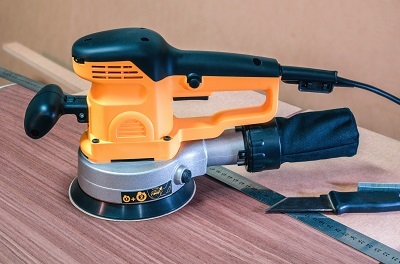
What is a Random Orbital Sander and How Does it Work
A random orbital sander is a handheld power tool used to sand wood, plastic, and metal, leaving an ultra-smooth surface. It is also used to scrape paint and stains from wood.
A random orbital sander has a sanding disc that moves in random circular patterns to evenly sand the surface without leaving marks behind.
While the tool is designed to leave no swirl marks behind, it still happens. Luckily, it’s possible to prevent and fix these swirl marks.
What are swirl marks When Sanding?
Swirl marks are visible patterns and scratches left on a wooden surface after sanding. These marks have different names depending on the pattern.
They are sometimes called:
- half-moons
- pigtails
- fisheyes
- fish hooks
- chatter marks
While they are usually visible, sometimes it can be hard to detect them. That’s why it’s recommended to wipe the sanded surface with a cloth dipped in mineral spirits to expose defects such as swirl marks and scratches.
8 Reasons Why Random Orbital Sander Leaving Swirl Marks?
1. Start On…. Stop Off –When Using an orbital Sander
What does this mean?
To prevent causing swirl marks, you should turn the sander on after placing it on the surface you are sanding.
Some users turn the sander on before placing it on the surface. This is one way that can result in these swirl marks.
Swirl marks will also occur if you turn off the sander while it’s still in contact with the surface.
How to prevent this from Happening?
When the sander is on and you place it on a surface, it does not make good contact with the surface. The first edge that comes into contact with the wood will dig deeper, leaving a scratch.
The right way is to place the sander on a flat surface when it’s off and then turn it on.
On the other hand, when you turn it off when sanding, slowing down when in contact with the surface will leave the dreaded swirl marks. So, lift the sander off the wood surface and then turn it off.
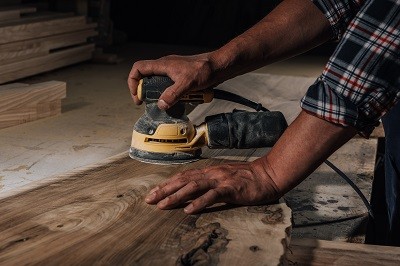
2. Sanding too fast or pressing too hard on the sander
Choosing how fast to sand and how much pressure to apply on a sander is usually a significant challenge for beginners, and there is no way out except by practicing.
How hard should I press with the orbital sander?
Unlike what most people think, random orbital sanders are designed to use very little pressure.
The weight of the machine and hands resting on the tool is enough pressure for the sander; light and firm.
When you press the sander down, not only is there a likelihood of leaving swirl marks, but you can also damage the surface or the tool.
One way to know when you are applying a lot of pressure is when the sander keeps getting hot. This means the motor is struggling to power the tool.
How fast should you sand with an orbital sander?
Again, this is a common mistake.
Random orbital sanders are designed to be guided slowly.
Some users tend to move it so fast since sanding slowly feels tedious. However, that’s the only way to do a great job.
The light pressure and slow speed keep the rotation and oscillation in sync.
The ideal speed for a random orbital sander is 1 second per inch. That means it should take up to 12 seconds to sand one foot.
Tip #1: Pressing down on a sander or sanding too fast does not remove more material. If you want to remove a lot of material from the wood surface, use coarse grit sandpaper instead of overworking the sander.
3. Insufficient dust collection
One key thing when sanding is removing dust from the surface during sanding. This is not just to keep the area looking clean but also to avoid swirl marks.
When fine dust collects below the sanding disc, there is little contact between the sander and the wood surface. This means instead of sanding; you are grinding the dust against the surface.
This leaves the surface uneven, with visible swirl marks.
If your sander has a dust collection mechanism, then this will be easier. However, you should keep checking to see if dust removal is working properly.
4. Incorrect Sand Paper grit size
Another common cause of swirl marks is using the wrong grit size and in the wrong order.
Sandpapers, just like coated abrasives, contain abrasive grains that sand the surface. Grit size refers to the grain size.
Grit size ranges from P8, P12, and P16 all the way to P500 and above.
However, in woodworking, the commonly used grit sizes are P60, P80, P100, P120, P150, P180, and P220.
What does incorrect sandpaper grit size mean?
When sanding, there is a proper way to sand. For instance, you must identify the correct grit size. Secondly, since you won’t be using just one grit size, you must follow the right sequence.
That is, know at what grit size to start and where to end.
| P40 and P60 | Ideal for removing old finishes and bumps |
| P80 | The ideal starting grit size when sanding the hardwood. Also ideal for removing saw blade burns and shallow scratches. |
| P120 | The ideal starting grit size for sanding softwood. |
| P150 | The ideal grit size when preparing a surface for polyurethane. |
| P180 | The right grit size to correct surface irregularities. Also ideal when prepping a surface for latex and acrylics. |
| P220 | Idea grit size when preparing the surface for staining |
| P320 | Ideal when you are sanding between coats |
| P400 | Ideal for smoothing top coats and when applying oils |
The next thing is identifying your starting and ending points.

For instance, if you are preparing wood for staining, you will start with P80 and end with P220.
In this case, there is a golden rule to follow.
The golden rule states that you should not skip more than one grit size when you are sanding.
If you start with P80, you can skip P100 to P120. Then skip to P150, and finally, P220.
You cannot skip from P80 to P150 since you will have skipped P100 and P120 grit sizes.
Failure to do this will result in swirl marks.
Tip #2: An old trick suggests going back one grit size after finishing. If you finished with the P220, finish by hand sanding with the P180 to remove any swirl marks.
5. Compressor capacity –For Air Orbital Sanders
There are two types of random orbital sanders: electric and pneumatic. Unlike electric orbital sanders that use power, pneumatic orbital sanders use compressed air to power the drums, belts, and sanding discs.
How does compressor capacity cause swirl marks?
First, air random orbital sanders require a regular supply of pressure at 90 PSI at any given time when under load.
If the air pressure goes below 90 PSI at any given time, swirl marks will start developing. This is common when the sander shares an air tank with another tool, lowering the air pressure.
While the air volume required by a random orbital sander differs from brand to brand, it mostly ranges between 15-18 CFM. Other factors that affect the air pressure are the air hose’s diameter and length.
Another cause of swirl marks is when the sander’s RPM goes down.
Typically, pneumatic random-orbit sanders have between 10,000 and 12,000 RPM (revolutions per minute), while electrical models have between 4000 and 10,000 RPM.
If the sander is not reaching 10,000 revolutions per minute for any reason, it’s bound to cause swirl marks. One cause of RPMs going down is aging and a lack of maintenance. That’s why taking care of your sander, keeping it oiled, and storing it properly is recommended.
To know whether your sander meets the specified RPMs, you will need a Vibrating Reed Tachometer.
6. Buildup on the sanding pad
Before starting to sand, you should check the sanding pad to ensure it’s clean. This is because buildup from the previous sanding job may cause swirl marks.
This will happen when the sander is used to remove an old finish from a surface. To remove the buildup from the sanding pad, you can use a fingernail brush, a piece of plastic, or an old shoe sole.
7. Issues with the sander
A malfunctioning sander may also cause swirl marks. Here are a few things
Damaged backup pads
If the backing pad that holds the sandpaper is damaged or worn out, it can also cause swirl marks.
The same will happen if the backup pad is out of balance from frequent use. When it deforms, the sander does not contact the surface correctly. This leads to scratches and inconsistent results.
If the backup pad is damaged, consider replacing it.
Worn-out bearings
Both pneumatic and electric random orbital sanders have internal bearings and others on the bottom.
These bearings can rust if water seeps inside the tool. High humidity, improper storage, and lack of use for a long time can also cause rusting.
The solution is to keep the bearings oiled, especially the ones at the bottom that rotate the disc.
Below are a few other maintenance tips for a random orbital sander
● Replace the backup pad regularly
● Don’t exceed the recommended air pressure
● Don’t apply a lot of pressure when sanding
● Store the sander properly
● Only use the sander for the recommended uses
● Service or maintenance should only be done by a qualified person
● When not in use disconnect the air sander from the air supply
8. Low-quality or a flimsy sandpaper
Yes, low-quality sandpaper can cause swirls. This does not mean using the wrong grit size but rather poorly made sandpaper.
Buy sandpaper from a reputable brand and switch to a new one when the grit is finished.
Swirl marks can also occur if the sandpaper is not securely attached to the sander.
Other causes of swirls include tilting the sander and if the surface is uneven.
How to prevent swirl marks caused by random orbital sanders
Having discussed the causes of swirl marks, it is easier to highlight ways to prevent pigtails.
1. When starting to sand, place the sander on the surface, then turn it on. After finishing, remove the sander from the surface it’s still on.
2. Don’t apply excessive pressure to the sander. Glide it across the surface.
3. Don’t move the sander too fast. Be firm but slow.
4. Begin sanding with a coarse grit sandpaper and work your way up to a finer grit. When changing the grit size, don’t skip more than one grit size.
5. If you are using an air random orbit sander, ensure the tool is getting the required air pressure under load.
6. Ensure there is no buildup clogging the sandpaper.
7. Ensure there is no dust between the sander and the surface to prevent grinding that results in marks.
8. Check the condition of the sander to ensure it’s working properly. Make sure the bearing and backing pad are okay.
9. Use high-quality sandpaper and securely attach it to the sander.
How to Eliminate Swirl Marks From Orbital Sanding
As I mentioned, swirl marks are inevitable. They happen to the best of us.
This means that if you’re a woodworker, you’ll need to know how to fix and remove them when they appear.
Before we get into the solution, the first thing you will need to do when you have swirl marks is to investigate why they happened.
1. Find the cause and do it right
Is it because you used the wrong grit size or the wrong grit size sequence? Or was it caused by the sander?
If it’s an issue with the sander, such as a worn-out backup pad or worn bearings, you will need to fix that first.
If it’s an issue with the technique, do the opposite. If an incorrect sanding technique caused the swirls, use the correct grit size.
If you sanded against the grain, then sand with the grain.
Other dos and don’ts include:
● Don’t push the sander.
● Don’t be too fast
● Don’t start too low with the grit size
● Don’t tilt the sander
● Make sure the sander is in great condition. The sandpaper is securely attached. There is no buildup on the sandpaper.
Compared to other types of sanders, random orbital sanders are the least likely to cause swirl marks.
So when the tool is in proper condition and sanding is done correctly, there is less likelihood of causing these marks.
Hand sand using the last grit size
Except for deep swirl marks, the first way to fix swirl marks is by hand sanding using the grit size that you used last on the sander.
For instance, if you used a P220 sandpaper, hand sand carefully and check if the marks are disappearing.
The reason why it’s recommended to hand sand is that you will be gentle and only focus on the areas that need correction.
Hand sand using a one-step back grit size.
This is very similar to the tip above. However, for this one, you are using a one-step-back grit size.
This means that after sanding with P220 sandpaper, switch back to P180 sandpaper. Just like the first tip, be gentle and keep a close eye on the swirl marks.
Go back down if the scratches are too deep.
The first two tricks are when the surface is level, but the marks are deep. If the marks are deep, the best thing to do is start all over again, then use a coarse grit size to remove the deep marks.
Go a step higher in grit size in sequence, but you can also skip only one grit size. The finishing point will depend on what you are sanding and why you are sanding.
When you are done, hand sand using the same grit size you finished with, or go a step below.
Frequently Asked Questions on Why Orbital Sander Leaving Swirl Marks
What sander does not leave swirl marks?
Unfortunately, there is no sander that cannot leave swirl marks. Whether it’s a rotary sander, drum sander, or random orbital sander. The only difference is in the size and shape of the marks.
The most significant determinant of whether there will be swirl marks is the user. These marks appear as a result of poor sanding or a faulty sander.
Do all orbital sanders leave swirl marks?
Yes, any orbital sander can cause swirl marks. However, orbital sanders are less likely to cause these marks when used well.
If you use the sander correctly, there are fewer chances of ending up with marks. Even if there are marks, they will be easy to correct.
Conclusion to Orbital Sander Leaving Swirl Marks
Swirl marks are common when sanding with a Random Orbital Sander. They result from sanding mistakes such as applying a lot of pressure to the sander, moving the sander too fast, using the wrong grit size or order, and tilting the sander.
Swirl marks also occur if the sander has a problem. This can be a worn-out sanding pad or worn-out bearings. Poor quality sandpaper or buildup on the sandpaper can also cause swirl marks.

I’m Thomas Steven with more than 12 years of experience in woodworking. It has always been my passion to become a successful woodworker. I have completed hundreds of successful projects. This blog is a way of sharing my woodworking experiences and what tools get the best results. I write about woodworking while being an associate with Amazon and I earn a little commission from every qualifying purchase.