A circular saw is perhaps the most versatile tool a DIYer can have in their arsenal. It’s lightweight, powerful, portable, and less intimidating than the table saw. For a DIYer starting in woodworking, you’re better off mastering a circular saw as it can help create just about anything.

A circular saw can make any straight cut into various materials. From miters to rip cuts, cross cuts, bevels, dados, and many others. Once you learn to set it up properly, you are on your way to breaking down sheet goods without wrangling them through a table saw.
And don’t get me wrong about the table saw. It’s got its place in the workshop, but it’s not a tool you can take to a job site. So, let’s get into how to make smooth, accurate cuts with a circular saw.
What’s a Circular Saw
A circular saw is a mechanical tool that uses electric power to turn a round blade. You can mount it on a workbench or hold it by hand. The round blade of a circular saw is edged with sharp teeth that turn at super-fast speeds to cut into materials. This power tool takes different blades depending on the material you intend to cut.
How Does a Circular Saw Work?
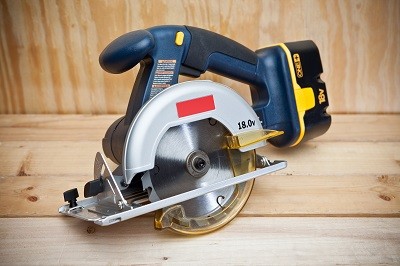
A circular saw has two handles, one at the front and another at the rear. The rear handle has the trigger and the safety switch, while the front handle adds stability when cutting. An arbor nut secures the blade on a circular saw. The sole plate has angle and depth adjusters to help make accurate, and safe cuts.
Uses of A Circular Saw
Now that you’ve bought your first circular saw find out its various uses for your DIY projects.
Getting Straight Cuts
A circular saw is best for getting straight 90-degree cuts. It can make straight and smooth cuts on lumbar, wood, and boards when paired with a blade with the right teeth count. Otherwise, you can use it for fast, abrasive cuts with a less teethed blade.
Cutting Large Pieces of Material
A circular saw is often the power tool of choice when cutting large pieces of wood and metal sheets.
Cutting Long Plywood
A circular saw makes easy work of cutting long pieces of plywood than when using other cutting tools.
Cutting Metal
Some circular saws, commonly known as cold saws, can cut metals such as steel, bronze, and brass. These circular saws have large diameters and are used alongside blades with sharp teeth to cut metals precisely.
Types of Cuts You Can Make with a Circular Saw
Cross Cuts
These are cuts across the wood’s grain to shorten long timber and board. The grain quality remains higher and it’s faster than a table or jigsaw.
Bevel Cuts
These are angle cuts made along a vertical or horizontal slope to join separate blocks.
Rip Cuts
These are cuts along the grain of the wood.
Dado Cut
This is a shallow cut made without going deep enough to cut through the wood. It’s the cut where you make a slot for another piece to go through.
Miter cut
This is a cut made when you change the angle of a crosscut to any other angle, like 45 degrees.
Groove Cut
This cut is similar to a dado cut in that it is shallow and does not go through the wood. However, groove cuts go with the grain of wood.
Plunge Cut
These cuts start in the middle of the sheet instead of at the edge of the material.
Materials You Can Cut With A Circular Saw
A circular saw boasts diversity thanks to the different types of materials it can cut. These include;
● Plywood
● MDF
● 2 x 4 pieces of wood
● Plastic
● Metal
● Concrete
● Brick
● Tile
Types of Circular Saw Blades
The material that a circular saw can cut depends on the paired blade. For example, you will need a diamond-coated blade to cut tiles. On the other hand, turbo-rim blades can be used to cut brick and concrete.
1. Handheld Circular Saw Blades

These are standard saw blades typically used to cut wood and wood composites. The teeth count on the blade determines the cut’s smoothness, speed, and type. Blades with a high teeth count create a refined finish, while those with fewer teeth are fast.
Handheld circular saw blades include:
Rip-cut blades: These blades have around 24 teeth and little or no bevel angle. They clear lots of material quickly but do not produce a fine, smooth finish.
Crosscut blades: These blades have a high tooth count ranging from 60 to 100. They also have a steep bevel angle that helps to prevent tear out. Tear out is when the wood fibers flex and give way before the blade reaches the wood’s edge.
Combination blades: These are blades that are between crosscutting and rip-cutting blades. You can use them for a variety of cuts.
Kerf blades: If you need to make a very narrow cut through a piece of wood, you will need a narrow kerf blade. Kerf simply means the width of the cut.
Plywood blades: Since plywood tends to splinter easily, plywood blades have more than 40 teeth to minimize splintering.
2. Continuous Rim Blades
These are diamond-edged blades that do not have gullets and teeth. Instead, they have diamonds affixed on the blade’s edge to create a clean finish. These blades can be used for dry or wet cuts.
3. Turbo-Rim Blades
These blades have serrated rims to cut through materials like concrete and brick. Turbo-rim blades range in diameter from seven to 12 inches. They cut more aggressively than continuous rim blades but cannot leave a smooth finish.
4. Abrasive Blades
Abrasive blades don’t have teeth similar to diamond-edged blades. They use an abrasive material like aluminum oxide and are suitable for cutting concrete, brick, and metal.
5. Segmented Blades
These are also diamond-edged blades, but their rim is divided by gullets. They are the most aggressive diamond-edged blades. In addition, they cut more quickly and can cut rigid materials such as brick and concrete.
How to Use a Circular Saw
Before we discuss using a circular saw, let’s go through its different parts in detail.
Step 1- Know the Parts of a Circular Saw
Motor – A circular saw has a motor to power the tool. Motors come in different configurations, so it’s essential to consider the RPM you need before buying.

Trigger – This part starts the saw simply by squeezing. Note that circular saws don’t have speed settings. Once you press the trigger, the tool will ramp up to the highest speed. Furthermore, some models have a safety trigger switch that’s thumb activated to prevent the user from starting the saw accidentally.
Blade Guard – A blade guard protects the user from the blade when it’s spinning. In addition, it protects the blade if you leave the saw on the ground. The blade guard will automatically retract when you start cutting. Nonetheless, you can retract the lever manually when you want to make plunge cuts.
Base Plate – Also known as the sole plate, this part has several markings and two notches. One notch indicates the location of the blade during regular cuts. The other notch will help you see the blade’s location when you set the base plate to make bevel cuts.
Depth Adjustment – A circular saw has a lever at the rear to set the cut depth. The blade should extend only a tiny amount below the depth of your material. Otherwise, you could cut too deep, putting extra stress on the saw. Depth adjustment allows users to score a surface before cutting, make notch cuts, or cut deep into thick material.
Bevel Adjustment – The lever or knob at the front of the saw sets the angle of the blade. Most circular saws have positive stops for 90-degree and 45-degree cuts.
Step 2 – Choose the Ideal Size
Most circular saws have 7.25-inch blades. 7.5-inch circular saws have a cutting depth of 2.5 inches. You will also find smaller saws, but the smallest one for woodworking should be 6.5 inches. This saw will give you a cutting depth of 2.25 inches.
If you want a robust saw that will cut deeper at an angle, go for an 8.25-inch circular saw. However, it has few blade options. Professionals use 10.25-inch circular saws since they are powerful. These saws have a cutting depth of 3.25 inches. On the downside, they are expensive and can be unwieldy.
Step 3 – Choose the Right Blade
It’s super important to choose the right blade for the job. We’ve discussed the different types of blades earlier. Nonetheless, your new circular saw will come with a standard 24-teeth blade. This blade is suitable for 2 x 4 wood pieces and general cutting.
You can arm yourself with an 18-tooth blade to make short work of any rip cuts. However, it leaves a rough finish on any crosscuts on plywood. On the other hand, a 40-tooth crosscutting blade leaves a nice edge, but it will bog down on longer rip cuts.
If you want to cut different materials, make sure that the blade you choose indicates that it can cut that particular material.
Step 4 – Prepare the Wood or Board You Are Cutting
First, place the wood on a flat surface, preferably a workbench. For short wood, ensure that the wood will fall freely to prevent kickback of the blade or bucking of the wood.
Secure the lumbar for rip cuts. You can use nails to tack the board down or clamp it if it’s very wide. When crosscutting plywood, place it on sawhorses but span them with 2 x4 pieces. This provides the support needed to minimize splintering.
Step 5 – Measure and Mark
Measure the material you’re cutting and mark it with a pencil or ballpoint.
Step 6 – Adjust the Saw Blade Depth
Now, place the saw with the base plate lying flat on the surface and the blade hanging off the edge. Use the lever at the rear to place the blade, so it’s no more than ¼ inch below the wood’s bottom. This will preserve the blade while giving you enough wood clearance.
Step 7 – Cut
First, let the blade run at full speed before connecting it to the wood. Now, guide the blade smoothly through the lumbar, using the notch to guide the saw along your cut line. Don’t push the saw too quickly. Keep in mind that the blade is about 1/8″ inches thick. As such, cut a little to the side of the line to get perfect measurements.
When your cut is complete, lift the blade clear of the material, and release the trigger. Wait for the blade to stop spinning. The off-cut should fall freely. When the off cut falls, the largest part of the circular saw should still be resting on the wood.
Again, don’t cut on short wood that’s supported on both sides. The wood can pinch the blade as you cut, and the saw will start to climb its way out, resulting in kickback. If kickback happens, release the trigger, lift the saw, and reposition your wood before continuing.
You’ve come to the end of your first cut with a circular saw.
Frequently Asked Questions About Using a Circular Saw
Do You Need a Table or Workbench to Use A Circular Saw?
A workbench is ideal for bracing wood when working with a circular saw since it makes the job straightforward. Still, you can set up your circular saw on a garage or driveway floor, owing to its portability.
How Do You Keep Wood in Place While Cutting?
Use C-clamps to hold wood pieces to each other or the workbench. Bar clamps are also invaluable accessories when dealing with wider pieces. In addition, you can invest in vises with wooded jaws to secure wood without damaging it.
Which Side of The Line Do You Cut with A Circular Saw?
Before making a cut, it’s important to measure accurately, keeping in mind that the blade will remove material in the cutting process. To this end, you should cut to the waste side of the wood so you can always trim back if you need to.
How Do I Make an Accurate Cut with A Circular Saw?
An accurate cut starts with accurate measurements. Then, cut on the waste side of the line, keeping the blade’s width in mind. Additionally, you can use a long beam level clamped to your material to help guide the saw for straighter, more accurate rip cuts.
A Kreg tool is another essential accessory that can help you make an accurate cross and rip cuts. You don’t need to mark or measure layout lines with it. It is a simple edge guide that can help you go from a beginner woodworker to a pro.
Can You Cut Curves with A Circular Saw?
Yes, if the curve is gradual, you can cut curves with a circular saw. Otherwise, a jigsaw is an ideal tool for curves. A circular saw is surprisingly quick and simple but will make rough curves. The trick is to make the curve gradual enough, so the blade doesn’t bind. If the blade binds or heats up, switch to the jig saw.
How Thin Can You Cut with A Circular Saw?
The circular saw is not ideal for cutting thin, accurate pieces. The blade can cut between 0 to 2 3/8 inches. However, it should project between ½ – ¼ -inch below the bottom of the material. For this reason, it will only cut about 2.5 inches deep.
In what Direction Does a Circular Saw Spin?
Circular saws rotate clockwise because of the upward stroke. The blade cuts from the bottom up, so cutting wood with the good side facing down is good practice. This will produce a super clean edge.
All circular saws are designed to cut up towards you as the front of the blade moves through the wood. Installing the blade correctly will ensure that you don’t get splinters, especially when cutting plywood.
A circular saw spins backward to allow it to throw sawdust out and clear the blade as it goes. In addition, spinning backward ensures that the teeth press the wood down. If the blade were to spin forward, it would lift the wood and drag it forward.
What Is a Circular Saw Kickback?
Kickback is when the blade gets pinched, causing it to lift up and out of the wood, you’re cutting, and driven back toward you. Kickback usually happens because of improper use of the saw or incorrect operating procedures.

Most people complain of kickback at the end of the cut. This happens because as you near the end, the material may bow downward. The blade will get pinched, causing it to stop suddenly, therefore kickback. This mostly happens during crosscuts on a long piece of wood. For this reason, it’s best to clamp the piece or support it on the rear end to stabilize it throughout the cut.
There are specific precautions to prevent kickback when using a circular saw.
● Always hold a circular saw firmly with both hands.
● Keep the blade sharp and clean. A sharp blade will cut its way out of a pinch.
● Be cautious when cutting sheets that are warped, knotty, or pitchy.
● Always use a blade that has adequate teeth set.
● Manage blade overheating as it can cause it to warp and result in kickback.
● Support large sheets so that they don’t pinch the blade.
● Minimize kickback by allowing short pieces to fall off the edge.
● Release the trigger immediately when you feel the saw is starting to bind.
Why Does My Circular Saw Get Stuck?
Your saw may get stuck if the blade is blunt, warped, or damaged. In addition, the piece of wood could be too long, and it’s not supported. Thus, the wood starts to sag down, putting lots of weight and pressure on the blade.
Your saw’s motor could be malfunctioning or overheating. Additionally, a circular saw where the blade depth is shallow cause it to get stuck. Finally, your circular saw can get stuck if the arbor is damaged or you have a loose clutch bolt.
Why Are Some Circular Saws Left-Handed?
Left-handed circular saws are designed for lefties. This is because it places the main handle in the left hand and the auxiliary handle in the right hand. The blade is to the left, so no hands or arms will cross over. Moreover, the shoe sits over the work-piece on the right. Hence, the off-cut falls to the left if you make small cuts.
Is It Okay to Cut Wet Wood with A Circular Saw?
No, a circular saw uses a fine-tooth blade, so there’s a chance the blade will bind on the wet wood. This is dangerous because of the resulting kickback. A chainsaw or a saw with coarse teeth is ideal for damp wood.
Can You Put Two Blades on A Circular Saw?
You cannot put two blades on a single-blade circular saw. Similarly, using a dado blade on a circular saw is not advisable. When you do, the blade will not rotate properly, and it will cause it to bind in the wood.
Are Circular Saw Blades Interchangeable Between Brands?
You can find interchangeable circular saw blades from different brands to fit in your saw. Bear in mind the diameter of the blade, arbor size (size of the center/shaft hole in the blade), and RPM rating before buying a blade. The RPM rating should not exceed that of the saw.
Are More Teeth on A Circular Saw Blade Better?
Blades with more teeth provide a more delicate cut and a smoother finish than few teeth. Nonetheless, blades with fewer teeth are faster and cheaper than high teeth count blades.
Can You Cut Sheet Metal with A Circular Saw?
A circular saw paired with a metal cutting blade can cut through metal up to about 3/8″ thick. Be cautious when cutting metal since hot metal chips fly everywhere. Wear protective gear and cover anything that may get damaged from the metal chips.
Safety Tips when using a circular saw
Now that you’re familiar with a circular saw, keep a few safety tips in mind.
● Always wear safety glasses for every single cut.
● Wear earmuffs if you’re making lots of cuts.
● Get a dust mask to protect your airway from fine dust.
● Always hold the blade firmly with both hands.
● Never wear loose jewelry, clothing, or hair that could get caught on the blade.
Dos and Don’ts When Using A Circular Saw
Dos
● Always use sharp blades since they are safer and faster.
● Do a saw check to make sure it’s working properly. Inspect the lower guard to see if it’s retracting and recovering properly.
● Learn to hold the saw properly.
● Remember to unplug the saw when it’s not in use. Remove the battery if you’re using a cordless circular saw.
● Set the cut depth to a safe level. Always ensure that the blade is not exposed too much under the material you’re cutting.
Don’ts
● Do not force the blade into the wood. Your work is to direct the saw, not to force it through the material.
● Don’t use a defective saw. If you hear any unusual sounds, unplug the saw and have it checked out.
● Do not overreach to try and cut more than your arms can extend.
● Do not cut on a material with obstructions such as nails, small wood pieces, etc.
How to Use a Circular Saw Like A Pro- In Conclusion
Making smooth, and accurate cuts with a circular saw takes time and practice. With this guide, you can face the circular saw with confidence. Remember the important tips we’ve discussed here, especially if it’s your first time using a circular saw. Safety is paramount when using power tools. With patience, you can master the circular saw and make it a favorite tool in your workshop.

I’m Thomas Steven with more than 12 years of experience in woodworking. It has always been my passion to become a successful woodworker. I have completed hundreds of successful projects. This blog is a way of sharing my woodworking experiences and what tools get the best results. I write about woodworking while being an associate with Amazon and I earn a little commission from every qualifying purchase.